The shot put event originates from heavy stone-throwing competitions in England and Scotland during the 15th century and was included in the first modern Olympiad of 1896 in Athens. Here we explain the more traditional linear movement which is a backward shift across the circle.
Think of all throws having three phases, a beginning, middle and end and in each phase there are several sections. In the case of the following linear technique, the beginning is the stand and sit followed by the middle, the glide, and turn, and the end is the delivery. For the rotational shot, the beginning is the pre-flight, the middle the take-off and transition and the end is the release
Within these sections are the behaviour goals we are looking to achieve in pursuit of good technique. The key to being successful at both techniques is to develop good rhythm i.e.1-2,3 turn the feet and punch the shot, with the angle of delivery slightly lower in the rotational shot
The following sequences are written for a right-handed thrower (12 o’clock is the back of the circle, so the front is 6)
Step 1: Stand
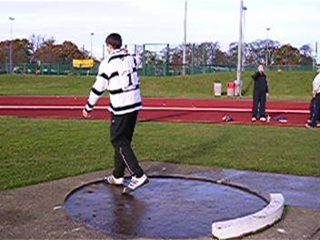
- Stand at the back of the circle facing 12 and hold the shot in the right hand with an even finger spread with thumb on downside
- Do not hold in the palm of the hand, but instead on the fingers
- The elbow of the throwing arm should be at shoulder height in the 12/3 position i.e. face & chest looking at 12 and the elbow pointing to 3
- Think neck-ball-elbow inline
- Maintaining this position until delivery will help the force generated go in the direction of the throw
- Keep body weight on the right foot with left foot slightly back from the right.
Step 2: Sit

- Sit by bringing the left foot close to right foot (don’t cross legs
at this point) then push back of the right heel, simultaneously driving
left foot back, so that legs briefly hold a split A position
Glide 3 – Glide

Two techniques can be used:
- Sit down and glide, takes a little longer (more air time)
- Sit backward and glide
- When starting the glide use a focal point at the back of the circle to hold attention and try to maintain chest and right arm in position (12/3)
- Down (slowly) glide then land with the right foot slightly flexed pointing at around 10
- The rhythm of the glide should be 1-2,3
- When landing ensure body weight has not moved over the left foot
Step 4 – Land

- When landing the body should be braced and body-weight over the
right foot with shoulders and elbow still facing the back of the circle
in 12/3 position; - The left foot lands between 6 & 5 just behind the stop board
- Remember to hold the core position and resist throwing until the
elbow has been moved to the low point of 12 as shoulders come around the
head - Important that the head remains passive so that the shoulders and trunk rotate around the head (core movement)
Step 5 – Turn
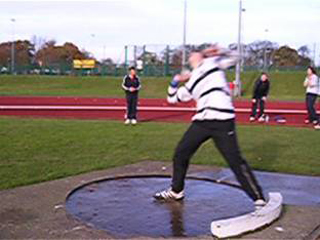
- Moving the feet only, ground the right foot underneath to make a
turn on the right foot toes and the left leg heel grounds to form the
block - Ensure shoulders are still parallel to the ground as a long (linear) straight line push on the shot is needed
- The trajectory of the shot should be around 45ْ to achieve optimum distance
Step 6 – Delivery

- Ensure core movement around head, do not drop left shoulder on delivery
- As the right (power) hand pushes the shot up at 45ْ so must the left (block) arm pull down at 45ْ to achieve a core throw
- Use the mnemonic phrase Punch Pop (punch the giant & pop the elf)
- When performing the right toe turn / left heel block with the feet punch the giant (the power arm punches up at 45ْ ) and pop the elf (as the block elbow comes down at 45ْ with equal force)